Weeping tiles are essential components of your home’s drainage system, designed to protect your foundation from water damage. Over time, these tiles can become clogged or damaged, leading to water infiltration and potential structural issues. Replacing weeping tiles is a task that requires precision, knowledge, and careful planning. In this guide, we will walk you through the process step by step, ensuring that you understand the intricacies involved in replacing weeping tiles effectively.
Understanding Weeping Tiles and Their Importance
Weeping tiles, also known as drainage tiles, are perforated pipes installed around the foundation of a building. Their primary function is to channel water away from the foundation, preventing it from seeping into the basement or crawl space. Without a properly functioning weeping tile system, your home is at risk of water damage, mold growth, and even structural instability.
Signs of a Failing Weeping Tile System:
- Persistent dampness in the basement
- Water pooling around the foundation
- Visible cracks in the foundation walls
- Musty odors or mold in the basement
- Sump pump running frequently
Assessing the Need for Replacement
Before embarking on a weeping tile replacement project, it is crucial to determine whether a full replacement is necessary or if repairs can suffice. Inspect the area around your foundation for signs of water damage, and consult with a professional if you’re unsure. In some cases, a partial replacement may be enough, especially if the damage is localized.
Planning and Preparation
1. Obtain the Necessary Permits
Before beginning any excavation work, ensure you have the required permits from your local municipality. Excavation around the foundation can impact utilities, and proper documentation is essential to avoid legal issues.
2. Gather Materials and Tools
Replacing weeping tiles requires specific materials and tools. Here’s what you’ll need:
- Perforated drainage pipe (weeping tile)
- Gravel or crushed stone
- Filter fabric (geotextile fabric)
- Shovels, spades, and a trenching tool
- Sump pump (if needed)
- Backfill material
- Waterproofing membrane (optional)
3. Plan the Excavation
Carefully plan the excavation to minimize disruption to your landscaping and avoid damaging utility lines. Mark the area to be excavated, ensuring you account for the width of the trench and the placement of the new weeping tile.
Step-by-Step Guide to Replacing Weeping Tile
1. Excavating the Trench
Begin by digging a trench around the foundation, following the path of the existing weeping tile system. The trench should be deep enough to reach the bottom of the foundation footing and wide enough to accommodate the new drainage pipe and a layer of gravel.
Key Considerations:
- Ensure the trench slopes downward away from the foundation to facilitate proper drainage.
- Remove any debris, roots, or old weeping tiles from the trench.
- Use caution when working near utility lines, and contact your utility company if you’re unsure about the location of underground services.
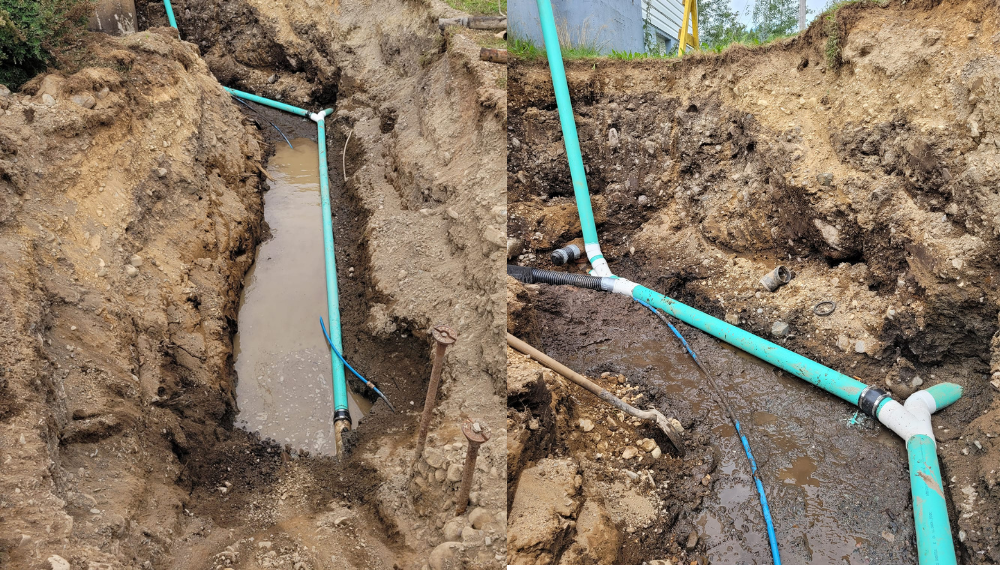
2. Installing the New Weeping Tile
Lay a 2-3 inch layer of gravel at the bottom of the trench to create a stable base for the new weeping tile. Next, place the perforated drainage pipe on top of the gravel, ensuring that the perforations face downward.
Important Tips:
- Wrap the weeping tile in filter fabric to prevent soil and debris from clogging the perforations.
- Connect the weeping tile to a sump pump or drainage outlet, depending on your drainage system design.
- Test the system by running water through the pipe to ensure it drains properly.
3. Backfilling the Trench
After installing the weeping tile, cover it with another layer of gravel, ensuring that the gravel extends at least 6 inches above the pipe. This layer will help with drainage and prevent soil from clogging the system.
Next, backfill the trench with soil, compacting it as you go to avoid settling. Consider adding a waterproofing membrane to the foundation wall before backfilling, as this can provide an extra layer of protection against water infiltration.
4. Restoring the Landscaping
Once the trench is filled, restore the landscaping by planting grass, shrubs, or flowers. Ensure that the ground around the foundation slopes away from the house to further aid in water drainage.
Installing Non-Perforated Weeping Tile: A Step-by-Step Guide
When it comes to protecting your home from water damage, installing a non-perforated weeping tile (also known as a French drain) is a highly effective solution. This guide will walk you through the process, ensuring that you can manage the project with ease.
1. Preparing the Trench
The first step in installing a non-perforated weeping tile is digging a trench. Start this at the base of your downspout, ensuring the trench slopes away from your home. The ideal depth for the trench is approximately 16 inches. Although hand-trenching is possible, be prepared for the challenge, especially if your soil is packed with clay and rocks. For a more efficient job, consider using a trenching tool or enlisting some extra help.
2. Connecting the Downspouts
Once your trench is ready, connect your downspouts to the weeping tile system. Begin by removing the existing downspout extensions. Use a T-fitting to connect the downspouts to the weeping tile. Ensure a secure connection by clicking the T-fitting in place and applying tape liberally to prevent leaks.
3. Laying the Weeping Tile
With your downspouts connected, lay the non-perforated weeping tile in the trench. Ensure the tile is placed evenly across the trench and that the slope is consistent to promote proper water flow. Once everything is in position, begin filling in the trench.
4. Preventing Erosion
After installation, it’s crucial to address potential erosion issues, particularly at the discharge point of the weeping tile. If heavy rainfall causes erosion at the discharge point, clear away any rocks below the weeping tile and lay down geotextile landscaping fabric. This simple step will stabilize the soil and prevent future erosion, saving you time and effort.
Post-Installation Considerations
1. Monitor the System
After replacing the weeping tile, it’s essential to monitor the system, especially after heavy rainfall. Check your basement and foundation regularly for signs of water infiltration, and make sure the sump pump is functioning correctly.
2. Regular Maintenance
To prolong the life of your new weeping tile system, perform regular maintenance. Keep gutters and downspouts clear of debris, and ensure that water is being directed away from the foundation. Inspect the area around the foundation for any signs of erosion or settling, and address issues promptly to prevent future problems.
When to Call a Professional
While replacing weeping tiles is a task that some homeowners may tackle themselves, it’s important to recognize when professional assistance is needed. If you’re dealing with severe water damage, structural issues, or complicated drainage systems, hiring a professional can save you time, money, and stress.
Conclusion
Replacing and installing weeping tiles, whether perforated or non-perforated, is a critical process that requires careful planning, precise execution, and ongoing maintenance. By following this guide, you can ensure that your home’s foundation remains dry and protected from water damage for years to come. A well-functioning weeping tile system is an investment in the longevity and safety of your home, providing peace of mind and safeguarding your property against the elements.